Monday, August 27, 2012

Chicken Stuffed with Fontina, Artichokes, and Sundried Tomatoes

As part of my quest to clear out recipes in my "to-do" box, I picked up some Fontina cheese today to make this dish.  On my way home, I thought - stuffed chicken breast... that probably means I'll be standing around beating the fight out of these chickens to flatten them out, which won't really go too well with my shoulder injury.  But to my pleasant surprise, this prep method was quite painless, and didn't require use of a hammer.

This dish came together very quickly, and with the right tools, it's fast, easy, and succulent.  I didn't know what to expect of the Fontina cheese, which is kind of like a Gouda but much softer, and perhaps smelled a bit more ripe.  This pungency survived the cooking process, and added a nice tang to complement the sweet herb flavor of the basil, the tartness of the sun-dried tomatoes, and the mellow garlicky base of the artichokes.  And to top that off, the mix was crammed inside of one of the most juicy chicken breasts I may have ever cooked.  Not too shabby.

I couldn't believe how moist these came out, and how quickly they cooked given their size.  Huge fan of this cooking method now.


Chicken Breasts Stuffed with Fontina, Artichokes, and Sun-Dried Tomatoes
from Bon Appétit, February 2008
 
  • 1 6-ounce jar marinated artichokes, drained, coarsely chopped
  • 1/2 cup grated Fontina cheese
  • 1/4 cup (packed) drained, coarsely chopped oil-packed sun-dried tomatoes
  • 1/2 tablespoon fresh basil
  • 2 5-ounce skinless boneless chicken breast halves
  • 1 tablespoon olive oil

The setup

Preheat oven to 375°F. Mix artichokes, cheese, tomatoes, and basil in medium bowl. Using small sharp knife and working with 1 chicken breast at a time, cut 2-inch-long slit horizontally into 1 side of chicken breast. Move knife back and forth in slit to form pocket. Divide 1 cup cheese mixture among chicken pockets (reserve remainder for frittata). Press edges to seal. Sprinkle chicken with salt and pepper.

Make your filling by coarsely chopping the ingredients and tossing together loosely to combine.  Don't squeeze it too tightly, or you'll end up with a cheese log.

This was way too much fun - slice through the side of the chicken breast and make a pocket, like you're opening a pita.  Don't slice through the opposite side, you want only one narrow slit and a huge cavern into which you will cram the filling.
Now spoon that filling in there, but don't overstuff

Heat oil in heavy large ovenproof skillet over high heat.  I vote cast iron, but stainless steel will work if that's what you've got.  Add the chicken and cook for 2 minutes.  Turn the chicken over, and immediately transfer the skillet to the oven.  Bake until cooked through, about (note: about, not exactly) 10 minutes.

Note that the filling wasn't so tightly packed that it started escaping out the side.  You'll burn your cheese if you do that, and nobody like that.

Get a nice browned crust on one side, then flip and transfer to the oven.

How do you know when it's done?  Get out your digital thermometer, and test the center.  If it's not at 160 or higher, add another few minutes.  After 10 minutes, mine was at 130.  So I gave it another 5, and it was perfect.  If you want to be safe, bring it up to 170, but even that will start to dry it out too much.  Serve with a starch and some kind of green vegetable, but ideally nothing too powerful to drown out the flavors of this.
 
The finished dish, served over spinach with roasted potatoes

Saturday, August 25, 2012

Alcohol Infusions 101: Bacon-Infused Bourbon in an Old-Fashioned

It's after noon somewhere, people - time to switch to hard liquor.  I can only post so many curry and stir-fry recipes, and figured you might want to see some of the more interesting drinks I've been trying to make.  So naturally, we have to start with a quintessential man-drink: bacon-infused booze.

Infused spirits seem to be hotter than that stupid song "Call Me Maybe" these days - everybody wants to have their alcohol taste like something else.  Now, whether this is because bars are trying to sell inferior alcohol or because it's a really interesting twist on making mixed drinks I can't say, but I do know this - infusions have been around for a long time, and they make awesome cocktails.  Typically you'll see herbs or fruit infused into an alcohol such as vodka or gin, but one of the more wild ideas that has come up has been to get the incredible healing powers of bacon somehow transferred into liquid form.  And since drinking bacon grease never took off, I'm all for this method instead.

Much like the underground city of Zion from the Matrix, this bacon infusion recipe is not the first, and probably not the last, that I will try.  We attempted this with vodka, and it was a dismal failure.  Then I tried following basic recipes for this bourbon online, and it didn't quite take.  This recipe is the third attempt, taken verbatim from the bar PDT's posting in New York magazine, although I made an adjustment to the bacon infusion process to make it more bacon-y.


Part One: Bacon-Infused Bourbon

  • 3 or 4 slices bacon, or enough to render 1 ounce of fat (any extra-smoky variety will do)
  • 750 ml of bourbon.  Something mellow - too harsh and no amount of bacon can save it

Always a good start to a recipe.  Or a Thursday.

Heat a pan over medium-low heat.  You're going to cook this bacon slower than you've ever cooked bacon before.  Why?  Because you don't want to burn any part of it, and you're trying to get the fat to drain out.  Now, cut the bacon into 1" squares or so.  Render down the bacon over this low heat, turning often, to convince the bacon to give you its tasty, tasty fat drippings, now in liquid form.  As the bacon cooks down, periodically remove the drippings from the pan until you have what you need.  If you start to see any black bits, you've cooked this too high, and I recommend starting over.  Run the fat through a coffee filter if you really want, but if you did this right you shouldn't need to.  Set the cooked bacon aside for your further pleasure.

Seriously, how can you do wrong when you've got the Gateway Meat in your corner?

The rendered fat should have no black bits floating in it

Now, let the fat cool slightly, and pour the bacon fat over the bourbon, which you've put in a clean mason jar.  Let the bacon fat sit with the bourbon for 24 hours at room temperature, then place in the freezer for up to a week.  The fat will rise to the surface and harden, and you can skim it off with a spoon.

Let the fat sit over the bourbon for a day or so at room temperature before freezing

After freezing for 1-7 days, the fat skims right off

I sampled my creation following this method and found that it didn't have enough bacon-y goodness, so I went and put some cooked, drained bacon in with the bourbon and let it sit for another week.  Then I ran everything through a coffee filter, and the finished product had what I would consider to be an appropriate amount of smoked bacon awesomeness.  In retrospect, I might have let the fat sit with the bourbon longer in the freezer, to see how much of a difference that makes.

Run through a filter at the end (if you used bacon pieces like I added later) to clean up the final product.  Enjoy!

What did I learn in this process?  Many things:

  1. Low heat is key here.
  2. If you don't cut up the bacon into small bits, too little of it will be in contact with the pan, which means it won't render down properly.
  3. Thick-cut bacon may not make much of a difference, but high-quality, smoky bacon will.
  4. Be sure to let the fat sit for a while with the bourbon, although room temperature for very long is probably a bad idea.
  5. Adding more bacon to the recipe (say, a full pound of bacon) will not help make this any better.


Part Two: A Bacon Bourbon Old-Fashioned
from PDT recipe posted in New York magazine, April 2008

  • 2 ounces bacon-infused bourbon
  • 1/4 ounce Grade B maple syrup.  Yes, Grade B.  Go find it, it's more powerful than Grade A.
  • 2 dashes Angostura or Regan's orange bitters
  • Twist of orange

In a mixing glass, stir 2 ounces bacon-infused bourbon, maple syrup, and bitters with ice. Strain into chilled rocks glass filled with ice. Garnish with the orange twist after running around the rim of the glass.

The ingredient list is short, and does not include a cell phone

I need a better picture of this to capture just how awesome it is.  Goes down way too smooth

Tuesday, August 21, 2012

Szechwan Eggplant and Peppers (Vegetarian)

My housemate delivered a bag of vegetables from a friend's farm, and I had to act quickly before they became one with the earth again.  So I laid them all out on the table and tried to figure out what I could make with them - eggplants, bell peppers, some other chile peppers, cucumbers, and tomatoes.  While I'm relatively sure that not much can combine all of those except maybe some kind of curry or an eggplant dip with raw vegetables, I decided to leave out the salad ingredients and use just the eggplant and peppers.  And just as I was about to make a pasta dish, I revectored to a stir-fry, armed with new recipes from my friend (see here).  Thanks, Julia.

This recipe is completely homespun, borrowing some ingredients from this and some techniques from that.  I think the final product came out restaurant-quality - a little spicy, velvety, pungent from the ginger and Szechwan peppercorns, and filling.  Highly recommended if you find yourself with a couple of eggplants about to go bad, and you're sick of simply grilling them.

Don't forget your passport, because your taste buds are going on vacation

Szechwan Eggplant (with Peppers)

  • 2 Japanese eggplants, cut into 1” pieces
  • 2 small or 1 large bell pepper, cut into 1” pieces
  • 1 hot pepper, cut into ½” rings
  • 1 tbsp ginger, minced
  • 3 cloves garlic, minced
  • 2 tbsp Szechwan stir-fry sauce (see this recipe for more detail)
  • 1 tsp Szechwan peppercorns, ground (optional)
  • 3 tbsp canola or peanut oil
  • 1 tsp sesame oil
  • 1 tbsp Shaoxing wine
  • 1 tsp cornstarch dissolved in 2 tbsp water
  • 1 tsp sesame seeds, for garnish

The setup.  Notice what's missing?  That's right - meat!

Chop and gather all ingredients.  Heat wok until smoking over high heat, and add 1 tbsp canola and ½ tsp sesame oil to the pan.  Stir-fry half of the eggplant, stirring frequently to avoid burning, until sticky, about 3 minutes.  While eggplant is cooking, add Szechwan peppercorns, if using.  Remove to a plate, and repeat with remaining half, also removing to plate.

Make sure to have everything at the ready, or this will get screwed up

Cook the eggplant until almost sticky, and set aside.  The eggplant will absorb a lot of oil, so don't get crazy.  Just add what's in the recipe and keep stirring

Reheat wok until smoking.  Add remaining 1 tbsp canola oil to pan, and add garlic, ginger, and Szechwan stir-fry sauce.  Be sure to have the exhaust fan on high, and try not to breathe.  Stir for 10-15 seconds, then add all peppers and cook for 1-2 minutes.  Return eggplant to wok, and deglaze with Shaoxing wine.

Stir-fry the peppers after infusing the oil with the aromatics and stir-fry sauce.  This will basically create a mustard gas-like sinus nightmare, so get the fans going, and try as hard as possible NOT TO COUGH!

Stir in cornstarch and water mixture, and toss to combine.  Cook for another 30 seconds and plate immediately.  Garnish with sesame seeds, if desired.

Deglaze with wine and add some cornstarch (or tapioca starch) and water to thicken it up and provide a bit of a sauce

Monday, August 20, 2012

Split Pea Soup with Smoked Turkey

I tried a split pea soup recipe here as a vegetarian version, and it just lacked a certain something.  I'm pretty sure that something was meat, although it's always possible that it just needed more salt.  But the addition of smoked protein, whether ham or turkey, really changes this soup from bland to savory, from a snack to a meal.  Unless you're a vegetarian, in which case it's just awful, and you should disregard everything you read here.  But here's a different take on the same basic soup, adapted from a Food Network Kitchens recipe.

Split pea soup with smoked turkey.  Now with ten times more meat than ever before!

Split Pea Soup
Adapted from Food Network Kitchens
 
  • 1 pound green split peas, picked over, rinsed, and drained
  • 3 smoked turkey legs, about 1-1/2 pounds total
  • 1 large onion, chopped
  • 1 stalk celery, chopped
  • 1 large carrot, chopped
  • 10 sprigs parsley
  • 4 sprigs fresh thyme
  • 1 bay leaf
  • 8 cups cold water
  • 1 teaspoon kosher salt plus more
  • Freshly ground black pepper
  • Baguette, sliced thinly into rounds

The setup.  Note that the herbs are tied together with twine, making for easy removal later

In a large soup pot or Dutch oven saute mire poix (carrot, celery, and onion) in olive oil to caramelize slightly.  Add the peas, hocks, water, and salt.  Tie the parsley, thyme, and bay leaf together with kitchen string and add to mixture.  Bring to a boil over high heat.  Lower the heat to a simmer, cover, and cook for 1-1/2 hours or until the peas are tender.

Saute the mire poix of vegetables to begin to caramelize

Deglaze with water, and add remaining ingredients

Remove the pot from the heat and remove the hocks. Cool.  Remove the meat from the hocks, discarding the bones, fat and skin. Chop the meat into bite-sized pieces, removing the tendons and other less tasty parts.  Remove the herb bundle and discard.

Chop up the smoked turkey and reserve until serving

Puree the soup with a hand held blender or in batches in a blender.  Heat the soup to a simmer with the meat and season with salt and pepper to taste. Serve in heated bowls with the croutons, if desired.

Toast the rounds in a toaster oven or conventional oven before serving

The final presentation could also be garnished with creme fraiche, sour cream, or a drizzle of sherry if you want another layer of flavor

Roasted Turkey Breast with Rosemary Roasted Root Vegetables and Homemade Cranberry Sauce

In an attempt to squeeze more value out of my meat slicer, I've been on the lookout for turkey breasts to roast.  I finally picked up a few on sale, and got a chance to cook one following my standard method.  Roasting just the breast is much more foolproof than a whole turkey, because you don't have to worry about the breast drying out before everything else is cooked through.  All you have to worry about is a single temperature - 160 degrees F.

Yes folks, heed my words - 160 degrees F!  Not 170, not 150, and certainly not 180... unless you're just as happy chewing on the sole of your shoe as you would be eating a delicious, moist slice of white meat.  Keep in mind that the temperature of any large solid object (turkeys, bricks, laundry) will increase at its center at least slightly once pulled from the oven, and you will be perfectly safe pulling a turkey breast out at 160, resulting in a final temperature of about 165.  Even the USDA says you can get away with 165 degrees, so why bother overcooking just because you refuse to live life on the edge?

I will add this - a digital probe thermometer is an absolute necessity for any kind of roast beast.  Dial thermometers are slow, inaccurate, and impractical unless you leave them in the bird constantly.  What's more, I am a hardliner about how I measure my temperature, which I accomplish using TWO probe thermometers; first, a corded digital oven thermometer such as this one, and second, a handheld thermometer, specifically this one.  We have the technology - let science work for you.  The oven thermometer stays in the bird and has a base unit that sits on the counter, beeps to let you know when your roast reaches your desired temperature, and allows you to keep the oven closed.  Consider this - Shirley Corriher says in her book Bakewise that opening the oven door for just 30 seconds will cause the oven temperature to drop by 150° or more, requiring several minutes to come back up to temperature.  So a leave-in thermometer will let you cook your bird faster and more uniformly, without heating up the house.  By the way, my second thermometer just confirms that my first thermometer is working right.  But a third thermometer, now that's just right out.

In addition to my roasted turkey breast, I served a few of my favorite (and arguably required) sides - steamed asparagus, roasted root vegetables, cranberry sauce, and a quick pan gravy.  I'll give recipes for these shortly, but first, a few words on root vegetables: eat them!  They are delicious, and I feel like they are a forgotten staple in the American pantry.  There are so many different root vegetables out there to add body and subtle flavors to otherwise bland foods, like adding parsnips to your mashed potatoes or a side of fried yucca with your burgers.

If you are the first person to post a comment back on this site with the correct identification of all the vegetables in the photo, I will let you choose which dish I will cook next.  You present me with three [reasonable] options, and I will pick one of them and make it to the best of my ability.  I will note that, as of 11/21/2012, this riddle has been solved.

 
Correctly comment with the names of all the vegetables and you select what I make next!

Anyway, I found a recipe online for a rosemary-roasted root vegetable dish, so I decided to abandon the exact ingredients and substitute what I could find.  As long as there's some balance in color and flavor, most root veggies can substitute for each other in this dish.

I will only quickly touch on the gravy process, which did not have many stellar pictures.  The cranberry sauce is an old family favorite though, so I will include that one.


Roasted Turkey Breast with Rosemary Roasted Root Vegetables and Homemade Cranberry Sauce

  • One (6-8 pound) turkey breast, thawed
  • 2 tbsp butter
  • 1 tsp salt
  • 1/2 tsp freshly ground black pepper
  • 2 cups chicken or turkey broth / stock, preferably homemade
  •  2 tbsp rosemary, thyme, or sage, depending on your tastes.  I recommend sage here.
  • 3 pounds assorted root vegetables (turnip, rutabaga, garlic, shallots, sweet potato, red potato)
  • 2 tbsp olive oil
  • 1.5 tsp salt
  • 1/2 tsp freshly ground black pepper
  • 1 quart cranberries (or more realistically, 1 bag)
  • 1 cup sugar
  • 1 cup water
  • 1/4 tsp cloves
  • 1/2 tsp cinnamon
  • 1/8 tsp nutmeg
  • 1 tbsp lemon juice

Let's start with the cranberry sauce, since it's so easy.  In a 2-3 quart pot, bring all ingredients to a simmer until berries pop.  Remove the berries with a slotted spoon, and continue boiling the remaining syrup until it is reduced by 1/3 to 1/2.  Transfer everything to a bowl, and refrigerate until set.  That's it!

Now, onto the turkey.  Preheat oven to 350 degrees F.  In a small bowl, melt butter.  Rinse turkey and place on a rack over a roasting pan.  Why use a rack?  Because otherwise it will stick to the pan and not cook evenly, and the bottom will come out gross.  If you have time to leave the bird out at room temperature for 30-60 minutes, do so.  This will make for more even cooking, and make sure the bird is dry before going into the oven, ensuring a good crisp skin.  RIGHT before you put it in the oven, season with salt and pepper, both inside and out.  Then pour the melted butter on the turkey, rubbing it onto the skin on all sides.  This makes for a deliciously browned, crispy skin texture that's, well, it's just great.  Finally, pour the broth around the bird in the roasting pan.  You can use this to baste the bird if you like, or it will just hang out and infuse more flavor into the bird, keeping it moist.

Preparing the turkey breast for roasting.  Butter has already been rubbed into the skin.

Insert a probe thermometer into the thickest part of the breast, away from the bone.  Set the temperature alert to go off at 160 F, as mentioned above, and pop your roasting pan in the oven.  You'll notice the temperature shoot up a lot at first, and you may think this rate will continue throughout the cooking.  Well unfortunately, the laws of thermodynamics are a harsh mistress, and you should see the temperature increase slow down as the bird approaches doneness.  I've had it look like we'd eat in 10 minutes, but it took 30 to finish!  Expect it to take about 1.5 - 2 hours total to roast a 6-8 pound bird.

Meanwhile, contemplate your roasted root vegetables.  I have a different recipe where you put them in the pan with the turkey, but this time I'm going for plain turkey that goes on sandwiches afterwards, with no notes of anything vegetative in the turkey.  So peel and chop your veggies into evenly sized bites, roughly 1" cubes or slices if you prefer.  I went for a mix.  Place these on a baking sheet lined with aluminum foil, or better yet, parchment paper, and toss the vegetables with olive oil, salt, and pepper.  Don't add the herbs (sage or whatever) just yet - wait 30 minutes before adding them, or they will burn and become bitter.  The olive oil is essential for conducting heat into the vegetables, which would otherwise just burn on the edges and bottoms, and get dry and weird everywhere else.

Put them in the oven when you think there will be roughly 1 hour left of turkey cooking time (30-45 minutes after you start the bird), and stir them every 20-30 minutes.  After 30 minutes, go ahead and add the chopped herbs.  Sage pairs well with turkey; rosemary and garlic not so much.

Prepped root vegetables, awaiting my further pleasure.

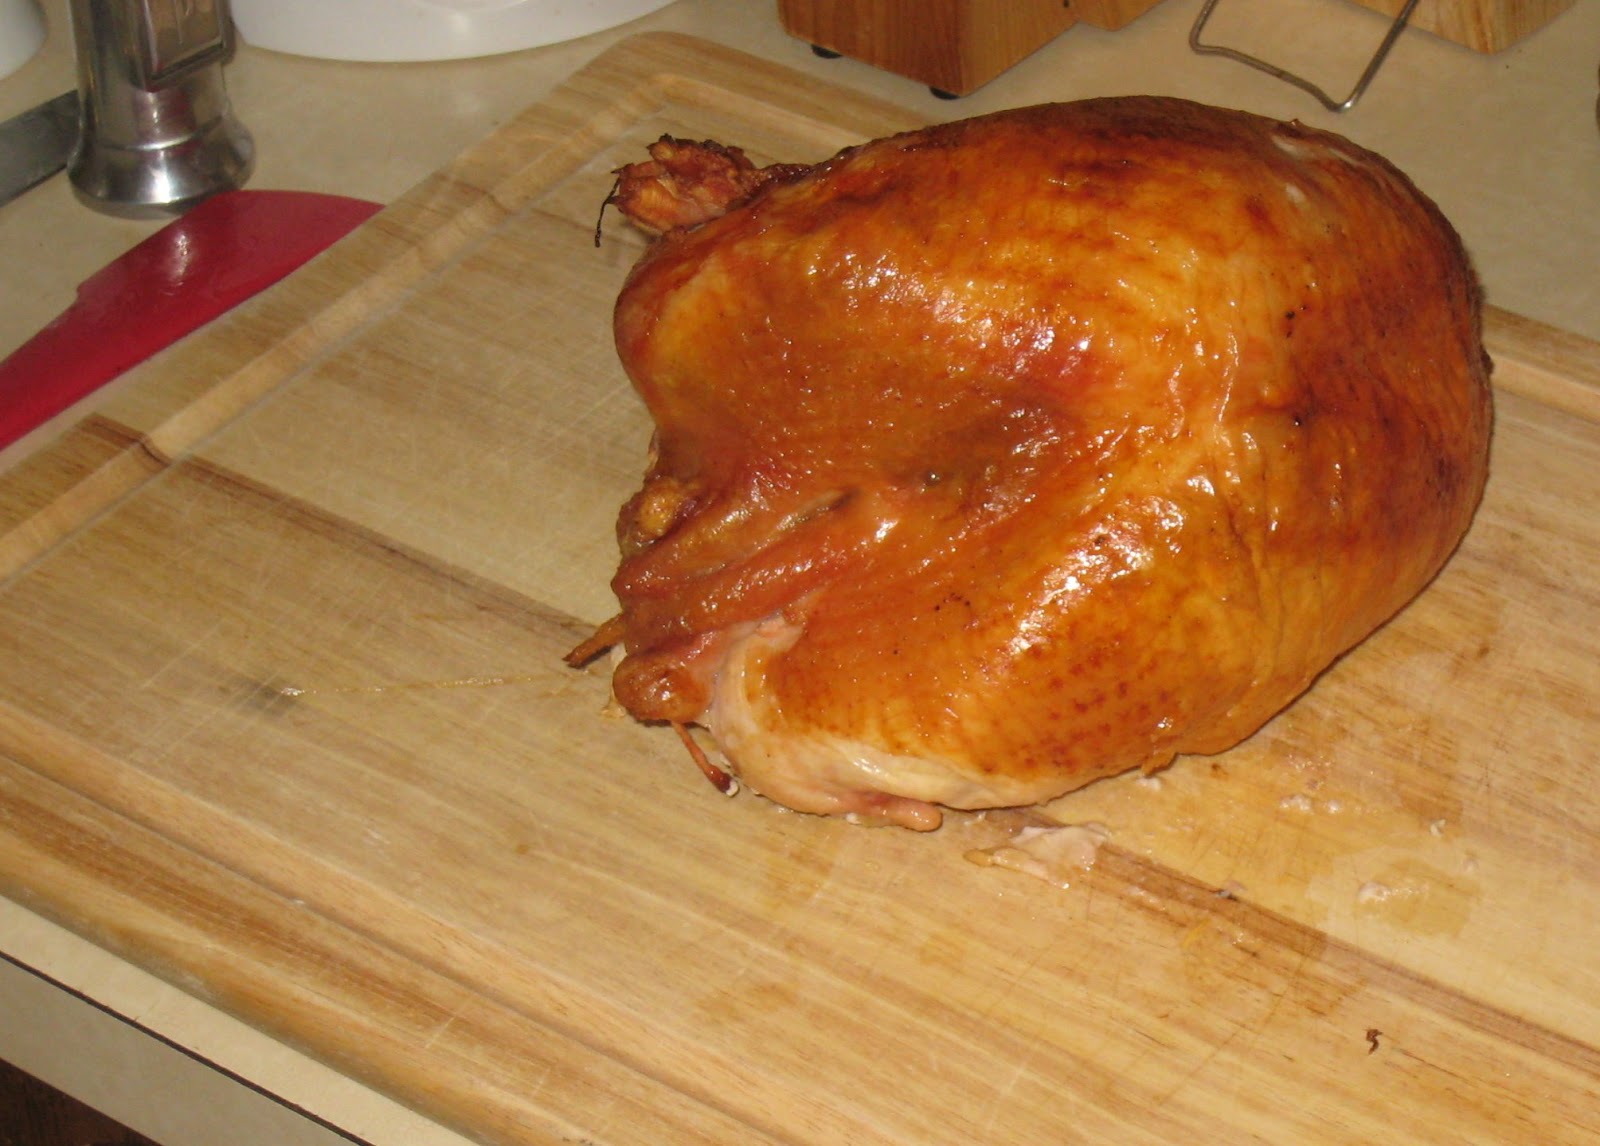
Once your bird is at 160 degrees, remove it from the oven.  I'll bet you think you're done, right?  Wrong.  You have to let the bird sit, to contemplate its existence for a while.  The bird is, understandably, pretty ticked off right now, and is ready to just blow up at you for throwing it into a hot oven after a stay in a perfectly good refrigerator.  If you plan to tent it with tinfoil, do so loosely, or else the steam will make the crispy excellent skin into something more like rubbery onion peels.  During this poultry meditation ritual, the bird will relax, and, being less uptight, will let its juices distribute evenly throughout.  Cut the bird too soon, and juices will run all over your cutting board and onto the floor, and the bird will be dry.  But if you wait 15 minutes, you will get a moist, succulent bird, still very warm, which has retained its beautifully crisped skin.

A roasted turkey breast in somber meditation before carving

As the bird is resting, finish roasting the root vegetables.  If they're not yet browned, give them another stir, crank the oven to 400 F, and keep going.  You want them to be slightly browned, not burned, and not just cooked through.  The browning is what brings out the caramelized sugars, which is really what you want in terms of flavor development.  It also gives the vegetables a pleasant crunchy texture, as opposed to one of baby food.

The finished roasted vegetables

If you want to make a gravy, you have three options:

  1. Use the weird bag of gravy that came stuffed into your turkey from the store (not advised)
  2. Stir up the pan drippings with white wine or cold broth and make a pan sauce (use when you have only a little liquid in the pan)
  3. Collect all the drippings, separate the fat, and make a traditional gravy (use when you have more than 1 cup of liquid in the pan)

I tried for option 3, but it didn't work out as I had hoped.  So I will table the gravy discussion until another article, most likely some time around November.

The end result, however, came out to be a festive pre-Thanksgiving feast.  The turkey was moist, the vegetables crispy and full of flavor, and the cranberry sauce refreshing.  All in all, this wasn't a very exhaustive meal to make until I made the gravy, which I find to always be the extra cooking step that turns a fun evening into an aggravating one.  So if you can live without gravy, this whole process should take less than 15 minutes of prep time and only minor monitoring throughout, with the end result being pretty spectacular.

The finished meal, seconds before I finished it.

Sunday, August 19, 2012

Pork Carnitas

If you've been to Chipotle (or any actual Mexican restaurants), you may have come across a mean pork dish called 'carnitas', which really just means "little meats" in Spanish.  Made famous in the Michoacán region of Mexico, large hunks of seasoned pork are cooked for a very long time in either broth (braised) or fat (rendered in lard, essentially) before plating with tortillas, lime, and cilantro.  I didn't quite feel like cooking an already fatty pork shoulder in lard for many hours, so I went looking for a broth recipe, and merged a number of them to create what I thought was a very flavorful but simple finished product.  Rather than deep frying to get the right kind of crisp exterior and moist interior, I created a two-step method of braising followed by quick browning in the oven, with enough liquid to prevent it from getting dry.  I've made this dish a dozen times, and it's a consistently easy hit among company.

First of all, this dish is greatly facilitated by a pressure cooker.  If you don't have one, a slow cooker might do the trick.  If you don't have that, maybe just a heavy pot.  And if you don't have one of those, you probably shouldn't be on this site.  To make this, I use picnic shoulder, but I've also used Boston Butt.  Either one is great, as it will have the right amount of fat to add to the very lean cooking method.  Don't get all crazy on me and put in a pork loin, or you will miss out on the flavor imparted by the fat which, if you do this right, is mostly cooked out in the process of slow braising.  An explanation is in the directions.

Pork carnitas, served simply with corn tortillas and black beans


Shredded Pork (Carnitas)

  • 2 16 oz cans of chicken broth
  • 1 lime, juiced, zest shaved first with zester or removed in large strips with a vegetable peeler
  • 1 large scallion, cut into 3 pieces
  • 3 garlic cloves
  • 4 pounds of boneless pork shoulder
  • 1 tbsp chopped coriander (cilantro)
  • 2 bay leaves
  • 1 tbsp cumin
  • Corn Tortillas
  • Chili sauce, such as Pico de gallo, chipotle or whatever you like

The setup.  It's a very short list, not hard to gather

Cut the pork meat in chunks and discard big pieces of fat, but leave some fat as it adds to the flavor.  Set a large pot or pressure cooker over mid-high heat.  Add the pork, garlic, lime zest, bay leaves, cilantro, cumin, green onion, juice from the lime, and broth.  I like to zest the whole lime into the pot and then just cut it in half and squeeze the mangled fruit juice right in there, making for easy cleanup.  If you prefer more tartness, add more citrus to your braising liquid.  Bring to a boil, reduce heat to low and simmer for about 3-4 hours or until the meat is very soft and pulls apart easily, or 1 hour for the pressure cooker.

Before simmering.  This is a really easy dish to get started, just throw everything in there and close it up.  Takes 5 minutes or less.

After simmering.  This meat is now incredibly tender and falling apart, so remove carefully

20 minutes before the stovetop portion is done, preheat the oven to 450 degrees F.  Remove the meat carefully and place it in a roasting pan, discarding the green onion and broth.  If you did this right, especially in the pressure cooker, the meat will fall apart, so you may need a slotted spoon.  Try to let as much of the liquid drain out as possible, which should contain a lot of the rendered fat from the pork.

Shred the pork with two forks, removing large bits of fat to lean it out some.  Drizzle some cooking liquid over and throw in the oven to crisp up

Grab two forks and shred the meat into bite-sized pieces.  As you shred the pork, it will be obvious where there are large lumps of unrendered fat.  You can pull these out and discard, making for a much more lean finished dish.  After you've shredded thoroughly, ladle back on about 1 cup of the cooking liquid from the pot, which you are welcome to run through a fat separator to avoid consuming the rendered fat.

After a few minutes in a very hot oven, the pork will develop an excellent crispy exterior without getting too dried out.  Don't leave it in too long.

Bake for about 20 minutes until the meat is brown and crispy.  Heat the tortillas and enjoy, serving with your favorite chili sauce, queso fresco, chopped onions, and cilantro.  Garnish with cilantro-lime rice, radishes, black beans, fried plantains, or whatever you like.

I had vegetarian friends over, so I added some pan-roasted vegetables with sofrito and vegetarian black beans

This dish also happens to freeze well, and has a number of leftover uses.  Put it over nachos, make it into a breakfast burrito, throw it in tacos, etc.  Basically, in the words of Jim Gaffigan, all you need is "a tortilla filled with meat, cheese, or vegetables", and you can recreate essentially any form of Tex-Mex food.  But at least with this recipe you know your dish will be a winner.

Saturday, August 11, 2012

Moroccan Chickpea Stew

In a bizarre fit of vegetarianism, I decided to make a chickpea stew the other day.  I had something similar at a French bistro, and it was so good that I decided to try it at home.  The beauty was that I had most of the ingredients in my pantry already, so I just had to buy some yogurt (which makes the dish, so don't skip it).

Moroccan cooking is heavily influenced by the French, so that's why I've added thyme to my recipe.  You won't see it in the original pictures, but I added it to the leftovers the next day and reheated on the stove, and it really brought a sweet, perfumed flavor to the dish that elevated it from a somewhat bland stew to something that seemed more, well, global.  If you really want to get crazy, the advice I got yesterday was to add za'atar, an Arab spice blend containing sesame seeds, sumac, thyme, salt, and other spices.  You can also cook this in a tagine if you're lucky enough to have one.

Moroccan Chickpea Stew, served over rice and garnished with greek yogurt


Moroccan Chickpea Stew
Adapted from Cooking Light

  • 1 tbsp extra virgin olive oil
  • 1 cup diced yellow onion (about 1 medium)
  • 1 cup diced carrot (about 1 large)
  • 3 garlic cloves, minced
  • 1 jalapeño pepper, minced, seeds mostly removed
  • 1 1/2 cups cubed waxy potato such as Yukon gold, peeled, about 1 large
  • 2 teaspoons ground cumin
  • 1 teaspoon chili powder
  • 1/2 teaspoon ground turmeric
  • 1/8 teaspoon salt
  • 1 tsp fresh thyme, minced, or 1/2 tsp za'atar seasoning (optional)
  • 1 (28-ounce) can diced tomatoes, undrained, or 4-5 fresh tomatoes, peeled
  • 1 (15 1/2-ounce) can chickpeas (garbanzo beans), rinsed and drained
  • 1 (14-ounce) can vegetable broth
  • 3 cups hot cooked rice or couscous
  • 1/2 cup plain low-fat yogurt, preferably greek

The setup.  You can use either canned chickpeas or the dried kind, but you'll need to cook them extra if you choose the latter.  FYI, I used a russet and was careful with the cooking time, but Yukon gold is preferred.
I should have used canned tomatoes, but I liked using my heirlooms from my garden.  If you're using whole though, peeling them would be preferable.  See my guide on that here and here.

Heat olive oil in a large saucepan over medium-high heat.  Add onion, carrot, garlic, and jalapeño to pan; sauté 6 minutes or until tender.  You can brown these slightly, but make sure not to burn anything.

Saute the more hearty vegetables first

Stir in the potato and next 8 ingredients (through broth).  Bring to a boil.  Cover, reduce heat, and simmer 15 minutes or until potato is tender.  If you use waxy potatoes like Yukon golds, you have some safety margin on overcooking.  If you use russets though, the starch will dissolve and your potato will turn to mush if you go too long.  Just something to be aware of.

Once you've sauteed the stronger vegetables, add the quick cooking potato, tomato, and chickpeas, along with the broth and spices.

The finished stew.  Everything cooks down quickly, so it's a very fast dish.

To serve, plate over rice or couscous.  A nice presentation I had once was to serve in a roasted eggplant half, which is then placed on a bed of couscous.  Top with yogurt and perhaps minced cilantro.

Wednesday, August 8, 2012

Oyako-Don (Japanese Chicken and Egg Rice Bowl)

I first tried this Japanese rice bowl in upstate NY - the birthplace of Japanese food - and decided that it was interesting enough that I should sort out the backstory.   Having heard the word 'don' before in conjunction with sushi (unagi don, tekka don, etc.), I figured out that this meant 'rice bowl', or something similar.  It's shortened from the word 'donburi', which means bowl.  Now, the interesting part comes from the word 'oyako', which translates as 'parent and child'.  That's because the dish is served with both chicken and egg, meaning that you can consume a whole family with every bite.  And if that's not an ego trip, I don't know what is.  The other thought I had about this dish is that, if people who keep kosher can't have milk and meat, does that mean they shouldn't have egg and chicken in the same bowl?  If anyone has insight here, let me know; all I know is that this is easy and delicious.

Oyako-Don: anti-kosher mystery, or savory bachelor chow masterpiece?

Oyako-Don is made by first brewing a batch of dashi, which is a multi-purpose Japanese broth made from seaweed and fish flakes.  They use it for everything - miso soup, flavoring sauces, polishing leather, you name it.  I will provide a recipe for it at the end, it's incredibly easy and gives the dish body.  Consider that one of the two ingredients was the grandfather of MSG, and you'll understand why people like this stuff so much.  It's like Japanese cocaine.


Oyako-Don

  • 4 cups cooked rice, kept warm
  • 1/2 lb boneless chicken breasts or thighs
  • 1/4 onion, sliced
  • 1 cup dashi stock (could be konbu/bonito or shiitake)
  • 1 tbsp soy sauce
  • 1.5 tablespoons mirin
  • 1.5 tablespoons sugar
  • 1/2 tbsp sake (optional)
  • 1 large or 2 small eggs
  • Green onion, chopped into 1-2 inch lengths
  • 4-6 snow peas, julienned (optional)

The ingredient list is short and sweet.  Note the homemade dashi in the measuring cup - don't use the powdered stuff if you can avoid it

Cut chicken into small chunks, and slice onion.  Put the stock, soy, mushrooms, mirin and sugar in a small saucepan and simmer for a few minutes.  Put the chicken chunks and green onion in the pan and simmer on low heat for a few minutes.  Add the onion to the pan and simmer a few minutes more.

Whisk the eggs in a bowl.  Bring the soup back to a boil, and pour the eggs over chicken and onion.  Sprinkle on julienned snow peas if using.  Turn the heat to low and cover with a lid.  Turn the heat off after 1 minute.  You want to cook the egg without disturbing it much, so it forms loose, puffy scrambled eggs right in the broth.

Let the eggs cook in the broth without disturbing.  I'm going for a smaller batch next time - the recipe is already halved from what I used, so no adjustments necessary.

Divide the hot cooked rice between 4 bowls, then place the chicken mixture over the 4 bowls of rice.


Dashi

  • 1 4"x4" square of konbu kelp, wiped clean with a damp cloth
  • 1/3 cup shaved bonito flakes
  • 4 cups cold water
The key ingredients to dashi.  At left, konbu, a type of kelp high in glutamic acid which led to the discovery of MSG (monosodium glutamate) and literally dripping with everyone's favorite new word, umami.  At right, bonito flakes, shaved from a very unhappy fish and bagged in individual packets perfect for one batch of soup base


Place the water in a medium saucepan.  Add the konbu.  Bring to a low boil over medium-high heat and discard konbu.  Add the bonito flakes and stir.  Turn off the heat and let stand for 2 minutes to allow the bonito flakes to settle.  Skim off any foam.

Line a large colander or strainer with cheesecloth and set it over a large bowl; carefully pour the dashi through to strain it.  Discard the bonito flakes.  The stock is ready for use and can be refrigerated for up to 3 days, but is best used the day it is made.  Called ichiban-dashi, this dashi is often used for clear soup.

LinkWithin

Related Posts Plugin for WordPress, Blogger...