Tuesday, December 25, 2012

Kokkinisto (Greek Braised Red Lamb with Tomatoes)

This year, Christmas Eve was spent cooking, taking pictures, and frantically trying to scribble down a surprise recipe that I would be proud to call the best lamb recipe I have ever made.  I think I need to just start following my brother around and taking notes on everything he does.  When I showed up yesterday to help make dinner, he was making two boneless legs of lamb into a dish that didn't sound quite my style.  So I asked if I could set one aside to do something different.  And while I'm rummaging around in my recipe folder for a lamb recipe, he just busts this one out off the top of his head, rivaling the best Greek restaurant lamb dish I've ever tried.  After thinking about it for the duration of the cooking process, he finally goes, "it's called kokonisto or something".  So we looked it up, and sure enough, there's a dish called kokkinisto, and even without a recipe he basically nailed it.  It's a braised meat dish (kokkinisto means "reddened" in Greek, I believe) cooked in tomato, and often with red wine, and just a tiny hint of cinnamon to accentuate the spiced flavors.  Usually lamb is used, but I found recipes for beef and chicken on the web as well.

Kokkinisto - braised lamb in a tomato sauce.  OMG.

I present the recipe as I will make it moving forward, just adding some red wine and serving over orzo, a rice-shaped pasta that really helps hold the sauce and is a traditional accompaniment in Greek restaurants.  But this was excellent on its own, and I devoured every bite, excited to make this again at my house.  And you should make it in yours.


Sunday, December 23, 2012

Bay Rum Aftershave

Witch Hazel - let's talk about it.  Have you ever bought any?  Do you know what it's for?  Did you think it's just some kind of weird old lady remedy for long-forgotten diseases, like scurvy, consumption, and the grippe?  If you answered 'yes' to these, read on.

No so long ago, I got my first straight razor shave.  Afterwards, the barber had all kinds of bottles of homemade tinctures, and he splashed some on my face and sent me on my way.  Well, I was bound and determined to find out what that was all about, and I think I narrowed it down to a couple of things - holy water, hyena mucous, or some kind of witch hazel mixture.  Figured maybe I'd start with the witch hazel one.

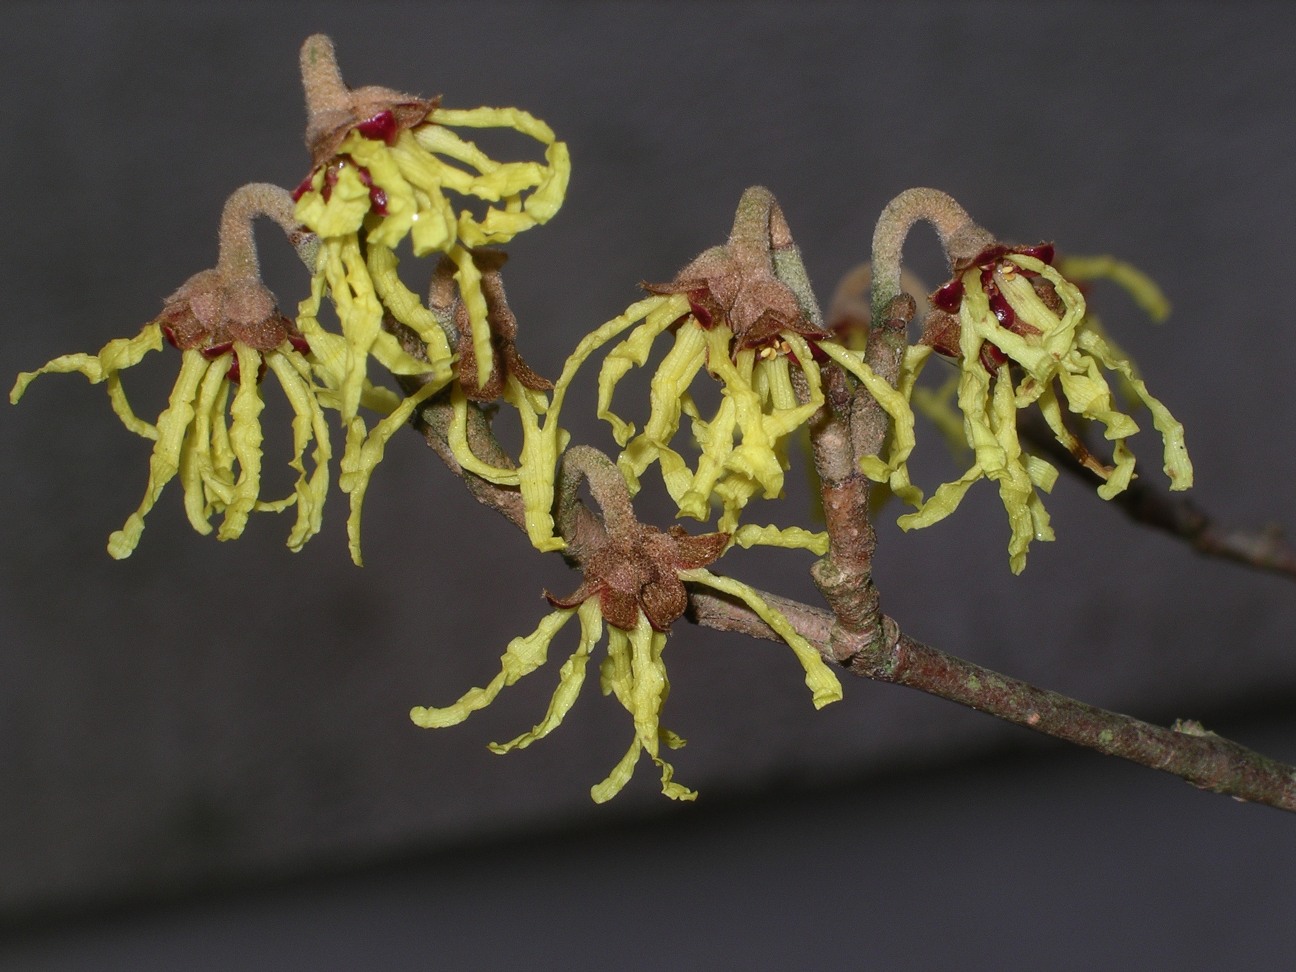
Witch-hazel is a deciduous shrub or small tree, and the leaves and bark are then made into witch hazel.  This was used by Native Americans for many years, having astringent properties used for everything from treating bug bites to curing hemorrhoids.  Frequent on the list of uses is in aftershave products.

Excited to use a product I've never tried, that also claims to prevent "sweating of the face", I ran out and bought a bottle, and tried using it straight.  Well, bad news - this stuff smells fairly odd in raw form, somewhere between rubbing alcohol and raw sweet potatoes.  So I went back and discovered that people using it as the base of aftershave, not exclusively.  I found a few recipes, merged them and added a few things, and this is the first attempt I made at an aftershave with a witch hazel base.  The result?  A spiced yet mellow concoction that I think smells suspiciously like Old Spice, but much more toned down.  It was a bay rum scent, literally made from bay and rum (and some other stuff).

Mystery vials - they look pretty cool next to my bathroom sink
This is witch-hazel, the plant from which the product of the same name is made.

Bay Rum Aftershave
  • 2 cups of witch hazel extract
  • 1 ounce of rum
  • zest from one orange
  • 1 cinnamon stick
  • 3-5 cloves
  • 3-5 whole allspice
  • 2 bay leaves, dry or fresh (or bay essential oil, if you have it)
  • Mason jar
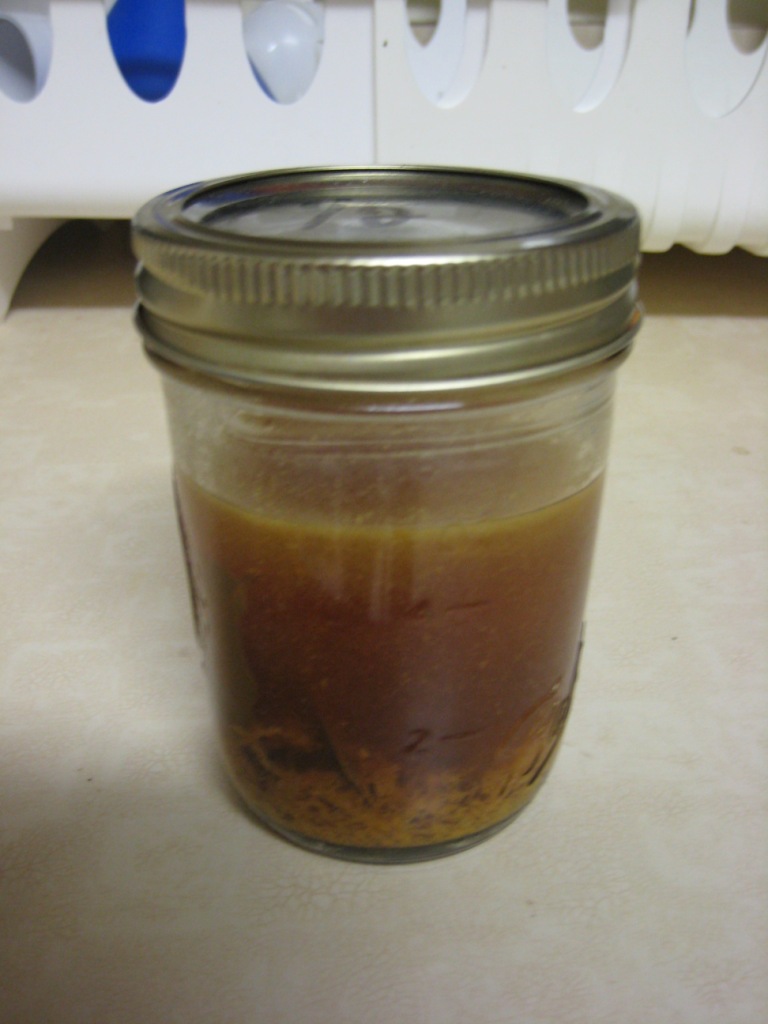
Place all ingredients in the glass jar, seal, and place in a dark spot for two weeks.
How the heck are these things going to work together?
...oh, I see.  Put them in a jar and make them play nice.
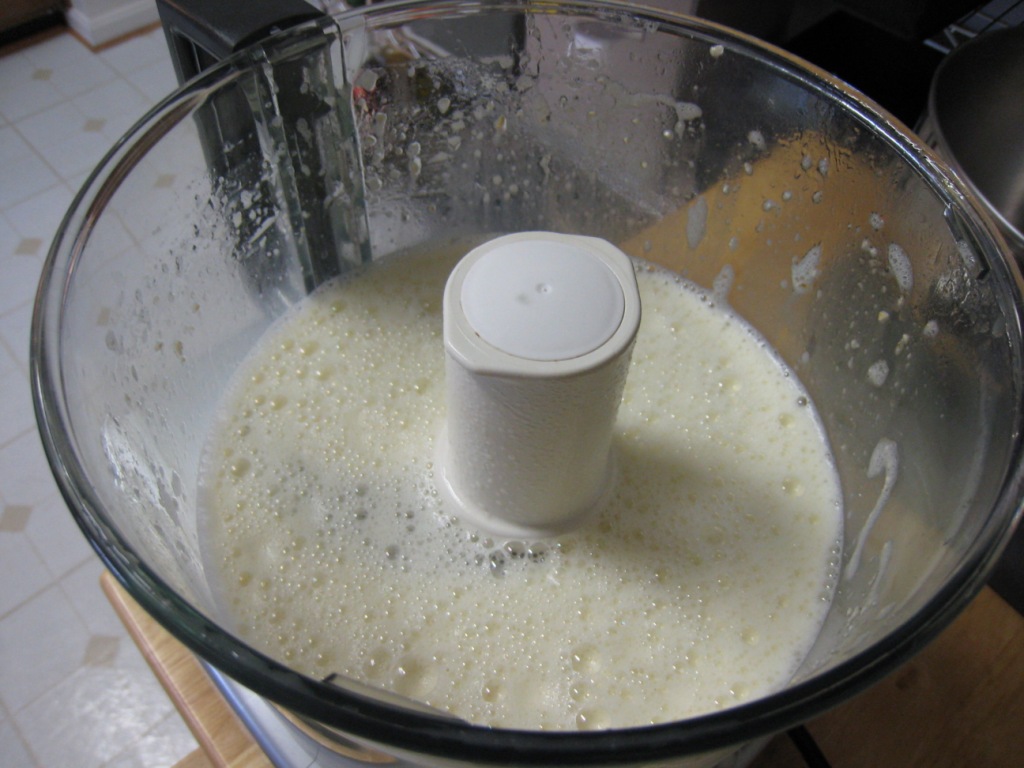
After the two weeks, filter through cheesecloth once or twice, and transfer to a small bottle.  Apply after shaving or use as an astringent.
After two weeks and some gentle shaking occasionally, the scents mellow significantly
Filter through cheesecloth
Transfer to a small bottle and use as you would aftershave
If you would like to go all out, add a half teaspoon each of aloe vera and glycerin, to really make your skin feel amazing afterwards.  I didn't have either of these, but I will invest for the next batch.  New recipes to follow!

Crispy Chicken Thighs in Mushroom Cream Sauce

As you may know, sometimes out of accidents amazing things are born.  I cite here vulcanized rubber, penicillin, Coca-Cola, teflon, and this chicken recipe.  I tried to make a dish from Jacques Pepin's Fast Food My Way calling for a quick cooked chicken thigh in a very fast mushroom pan sauce, but I tried to cut too many corners and came up with something that, while looking unappetizing, tasted amazing.  So I took it a step further and turned it into a cream sauce, preserving the cooking technique for the chicken and the sauce but adding a few steps and ingredients.  I was amazed with the results, which were still easy and amazingly delicious.  The mushroom cream sauce is on par with the best cream of mushroom soup I've ever eaten, just FYI.


You can make either the chicken, the sauce, or both, and any part of this will be great.  I had never seen this technique for cooking chicken, which is strange on at least two levels, but it really works.  I will definitely be using it in the future.  And while I'm not sure how he even figured it out, I will say that Jacques is a miracle worker of quick-cooked food techniques.


Friday, December 21, 2012

Cranberry Oatmeal Pancakes

Let me temper this recipe with a caveat - I'm not a huge fan of pancakes.  I feel like people who love pancakes are basically ready to stab their own mother for just one more hit of maple syrup-soaked cake goodness, and somehow they can devour a whole plate of these things without batting an eye.  I, on the other hand, usually get through about 3 bites of pancake before I'm ready to walk away in need of something with a bit more flavor.  Unless they're really good, which they most often are not, pancakes are just kind of vanilla.


In stark contrast to your average pancake recipe, I found a very bizarre-sounding recipe in a Vitamix blender cookbook, of all places.  It called for different flours, the use of oats, seeds, and berries, and generally all healthy stuff.  And since I don't think many of you have a Vitamix, or pore over the recipe book it came with if you do, I'm going to repost it here, with slight variations (I don't have a Vitamix either, is the weird part).  I thought this was really good, had an interesting consistency, and was rather healthy by pancake standards.  Also, with minimal tweaking I believe this is a gluten-free dish, but I can't back that up. 
These pancakes have all kinds of surprises inside - seeds, oats, and cranberries.  It's like a piƱata for your mouth
Cranberry Oatmeal Pancakes
From: Vitamix blender cookbook

Yield: 10-12 pancakes
Total Time: 25 Minutes
  • 1.5 cups milk, soy milk, rice milk, or almond milk (I used rice milk)
  • 1 large egg
  • 2 tbsp light olive oil or vegetable oil
  • 3/4 cup (60 g) uncooked, rolled oats
  • 1.25 cups (150 g) whole wheat flour
  • 2 teaspoons baking powder
  • 1/2 tsp baking soda
  • 1/2 tsp salt
  • 1/4 cup (26 g) flax seed meal
  • 1/4 cup (30 g) dried cranberries
  • 2 tablespoons (15 g) unsalted sunflower seeds
Not your average pancakes!  This is kind of the royal family of pancake ingredients, including flax meal, a very  interesting nutty product made from ground whole flax seeds


Place milk, egg, oil and ¼ cup (20 g) rolled oats (NOT ALL OF THEM!!!) into a blender or food processor bowl.  Blend / chop / whatever you've got on medium speed for about 20 seconds to incorporate.


I didn't know if my food processor would properly pulverize the oats, but there was so little compared to the amount of liquid that this was no problem

In a large bowl, combine the remaining oats, flour, baking powder, baking soda, salt and flax meal, stirring to combine.


Crazy pancakes - when a big bowl of white flour just won't do.  Clockwise from top: salt, baking powder, oats, flax meal, whole wheat flour

Add the wet to the dry.  The order matters!

Pour wet mixture into the dry ingredients and mix gently by hand to combine.  Stir in the dried cranberries and sunflower seeds.  Allow mixture to set for 10 minutes before cooking.

Fold in the seeds and berries, and let this sit for a few minutes.  You want the double acting baking powder to act once, creating air bubbles that will give you a nice fluffy product before cooking.  The second 'act' of the baking powder happens when you heat it.

I found that this batter was a bit thick, so you can dilute with a bit more milk if you like thinner pancakes.  Cook in melted butter on a skillet, ideally one of the electric variety, until bubbles around the edges start to set.  Flip and cook for another couple of minutes.

Look for the bubbles around the edges to set up

To serve, I would use a berry-based syrup such as boysenberry or blueberry.  Or if you really want to drive home that you're eating something different, use cranberry sauce!
Crunchy, nutty cranberry oatmeal pancakes.  Treat your body to a healthy breakfast.

Sunday, December 16, 2012

Candied Pecans

Pecan lovers of the world unite!  Here's a simple recipe for candied pecans which you can make in just over an hour.  I hesitate to give this one out because it's so good, but since it was passed to me by a family friend I feel comfortable passing it to the rest of you.  Just don't tell anyone!  You can give these out as gifts, go to town on them yourself, use them as a salad topping, or shove them up your nose.  I don't really care what you do with them, but I will insist that they are better when taken orally.

This recipe post is a reboot from December 2011, but since I learned how to use my camera a bit better since then, I'm reposting with edited visuals.

My 2012 batch of spiced pecans.  Coming your way soon, if you've been good

Candied Pecans
by Robin Connell
  • 1 egg white
  • 3 to 4 cups pecan halves 
  • 1/2 cup sugar
  •  3/4 teaspoon salt 
  • 1 teaspoon cinnamon 
  • 1/4 teaspoon ground cloves 
  • 1/4 teaspoon nutmeg 
  • 1 tablespoon water

The spice assortment for a double batch.  Clockwise, from center: sugar, sea salt, Saigon cinnamon,  freshly ground nutmeg, freshly ground cloves.  Don't even bother with old spices, if you're going the distance use high quality for this.
Is that... yes!  It's a half gallon of pecans.

Place egg whites in a large bowl.  Add water and beat lightly.  Add nuts and stir until moistened.  Mix sugar, salt and spices in a small bowl.  By the way, don't assume you can just pour everything piecemeal over the nuts, or you will get bits that taste intensely like cloves, and other bits that taste like pecans and sugar.  Mix up those spices first.

Lay everything out on 1-2 baking sheets, preferably lined with something.  I used parchment paper.

Pour the spices over the nuts and mix well.  Put the nuts on a well-greased cookie sheet.  Stir 2 or 3 times while cooking.  Bake for one hour at 250 degrees.  Try to pull them out before they turn too dark, or else they will be over-roasted and taste more like coffee than anything else.

The finished products, vastly improved from last year's overcooking

Allow these to cool, then break up gently.

Allow nuts to cool on sheet, stirring lightly to dislodge cooled sugars from parchment, foil, or pan.  Break apart large clusters of nuts gently, or don't if you're concerned that you will break up the nut halves.  Store in a tin, or a bag - if they last that long.


Candied pecans, bagged and ready to go for the holidays

Saturday, December 15, 2012

Duck Fried Rice with Napa Cabbage


After cooking a duck recently, I found myself with approximately half a duck just sitting in the fridge, waiting  to play out the rest of its life in some twisted culinary experiment.  I think it met an admirable fate in the form of this duck fried rice with Napa cabbage, which is a bit different from my usual fried rice recipes in that it had less rice than other ingredients.  The cabbage, although cooked down, gives this dish a nice crunch and slight bitterness, and the whole straw mushrooms keep you guessing about what's in the next mouthful.  And the best part of this dish was the rich duck flavor, imparted not only from the duck meat, but from the duck fat that I cooked this in.  Bottom line, if you cook a duck, SAVE THE DUCK FAT and make this recipe.  I don't care what meat you put in, but trust me, duck fat is like stir-fry gold if used properly.  Let's discuss....


Lots of Napa cabbage brings a great texture and flavor to this dish


Duck Fried Rice with Napa Cabbage
by Tyler Florence, process modified slightly by me

Serves: 4 to 6

  • 5 tablespoons duck fat or, if you don't happen to have duck fat (and who's to blame for that?), peanut oil
  • 2 shallots, thinly sliced 
  • 2 garlic cloves, minced 
  • 2-inch piece fresh ginger, peeled and grated 
  • Pinch red pepper flakes 
  • 1 small head Napa cabbage, cored and chopped - probably 2 pounds' worth
  • 1 (8-ounce) can straw mushrooms, drained and rinsed 
  • 1/2 cup frozen peas, run under cool water for 2 minutes to thaw 
  • 1 generous pinch kosher salt 
  • 2 large eggs, lightly beaten 
  • 1 pint cooked long-grain white rice 
  • 3 tablespoons soy sauce 
  • 1 cup cooked duck meat, cut in pieces 
  • Fresh cilantro leaves, for garnish 

Note the container of duck fat on the right - that's good eatin'!
Another look - duck hasn't been deboned and chopped yet, and the rice has yet to be pre-treated with fat


Heat 2 tablespoons of the fat or oil in a wok or large non-stick skillet over medium-high flame.  Give the oil a minute to heat up, then add the shallots, garlic, ginger, and red pepper flakes; stir-fry for 1 minute until fragrant.  Add the cabbage, mushrooms, and peas, stir-fry until the cabbage is wilted and soft, about 8 minutes; season with a nice pinch of salt.  Yes, 8 minutes - don't just stir this around - cook it down a bit.  I was worried it would overcook, but it definitely did not.  Remove the vegetables to a side platter and wipe out the wok. 


Stir-fry your aromatics.  Be sure not to skip the shallot!  They're cheap at the Asian grocery stores

Add the cabbage with the mushrooms and peas, and cook for a few minutes


And now, a short aside about rice.  Use leftover rice for this, do not cook it fresh.  If you do, there will be way too much moisture in the rice, and you'll end up with a gummy, squishy mess that nobody wants to eat.  Putting things in the fridge essentially dehydrates them, unless they're in the best of tupperware.  So let your rice go stale in the fridge for a few days, to the point that you wouldn't want to reheat it and it plain.


While the wok reheats, place the rice in a large bowl, take 2 tablespoons of your delicious duck fat, and pour it on the rice.  Break up the rice with your fingers, working the fat into the mess to coat all of the grains with fat.  What this is doing is protecting the rice by creating a moisture barrier and ensuring that it really fries, rather than fries only on the bottom of the wok and steams everywhere else.  You'll use the same amount of oil as the normal recipe, you'll just use it more smartly.  I didn't take pictures here, but I learned this trick from About.com's pineapple fried rice recipe, which I posted and have pictures of here.


Put the pan back on the heat and coat with the remaining 1 tablespoon of oil.  When the oil is hot, pour the eggs into the center of the pan.  Scramble the eggs lightly, then let them set without stirring so they stay in big pieces.  Fold in the rice and toss with the egg to combine well.  Allow the rice to sit for a few seconds, then flip it around; repeat this process for a minute or two to fry up the rice.  After you're satisfied that the rice is now 'fried', add your duck, return the sauteed vegetables to the pan, and moisten all with the soy sauce.  Toss everything together to heat through and season again with salt.  Spoon the fried rice out onto a serving platter, lay the pieces of duck on top, and garnish with cilantro.


Notice the rice isn't at all breaking down, which it used to before I coated grains in oil.  Or sweet, delicious duck fat.

Tuesday, December 11, 2012

Korean Spicy Pork Barbeque (Daeji Bulgogi)

I'm starting to think that most street food, no matter what culture it's from, can be replicated at home.  I'm not talking about that certain special something that years of experience grants to these road warriors, but I am convinced that certain staple foods you can get in ethnic restaurants are easy to duplicate.  Hot on the heels of my pho experience, I attempted to make pork bulgogi - a Korean barbeque dish served in restaurants all over the country, and becoming popular here.  Restaurants are popular because either you cook the food yourself, or the food is cooked right in front of you.  And unlike the pho recipe from last time, I was able to cook this cheaper and faster than the restaurant alternative, and escaped being gouged for what is, if nothing else, just a glorified marinated pork dish.  The experience started me thinking: what other foods am I overpaying for, that I could make on my own?  So now what?  Cuban sandwiches?  Gyros?  Wait and see, I guess.

Cooking Korean bbq at home - you won't believe how easy this is


Sunday, December 9, 2012

Sichuan-Style Steamed and Roasted Duck

Here's a crazy duck recipe I've been sitting on for almost a decade before making - Chinese roasted duck, similar to Peking duck but with different seasoning.  An incredibly popular dish in Chinese restaurants, this is similar to the duck you see hanging in windows in Chinatowns around the world.  Making this dish clued me in to what I was actually looking at - a duck par-cooked to start the process, then basted in a sweet syrup and left to air-dry to ensure a crispy skin before being roasted.  This means that those hanging ducks, while edible, are only part of the way done.  While the process of this recipe is very similar, there are a few things I just won't be able to do, such as cook the duck in a traditional hung oven where it can be roasted over a wood fire.  I'll be trying this recipe again with a different recipe, but this was pretty delicious in its own right.  Not quite the lacquered, crispy skin that made the dish famous in Beijing, but it was really good, and a lot of fun to make.

After a bit of digging, I discovered that the flavors used to make this duck recipe are less like that of Peking duck and more like that of a Sichuan dish, Xiang Su Quan Ya.  That dish is very similar to this but fried at the end rather than roasted, and omitting the glaze.  So this recipe is somewhere between the Sichuan and Peking cooking method, but much more like the Sichuan flavorings given the use of Sichuan peppercorns.


If you haven't cooked one before, duck is really fatty.  There are a lot of things that are done to duck to try to get some of the fat out of it.  You can roast it low and slow to render out the fat while cooking.  Or you can do what the Chinese do, blow air under the skin (somehow, I can only conjecture how this is done) to loosen it and then savor every delicious bit of the crispy skin with a hint of the fluffy, roasted duck fat underneath.  I like the pre-steaming method of this recipe, similar to the other typical Chinese step of boiling briefly but done with more of an emphasis on releasing the fat in addition to shrinking and tightening the skin for a better crispness.  Plus, this duck is crammed so full of aromatic herbs, fruits, and vegetables in this step that even if you put nothing on it and ate it steamed, it would be delicious.

My recipe will modify the process slightly from the original recipe, despite my following the original more closely, to fix a few problems I found with the methods.  It also explains how to make your own Chinese 5-spice, which is amazing but POWERFUL.  A little goes a long way.


Chinatown Steamed and Roasted Duck
Recipe adapted from Tyler Florence, "Food 911: Chinese Take-Out"


  • 1 whole (4 to 5 pound) duck 
  • 2 tsp Chinese five-spice powder, recipe follows (note: very powerful, don't use too much)
  • 2 teaspoons sugar 
  • 2 teaspoons salt 
  • 5 big slices fresh ginger, cut in 1/8" – 3/16” slices
  • 4 garlic cloves 
  • 1/2 bunch green onions 
  • 1 tangerine, peel cut in big strips 
  • 1/4 cup rice vinegar 
  • 1/2 cup honey 
  • 1/2 cup soy sauce
The ingredients, including homemade five-spice powder (recipe follows)

To diminish the fat and produce a crispy skin on your duck, begin by trimming the excess fat from the neck and body - yank out any large pieces from the butt end, basically.  Rinse the duck, inside and out, and pat dry thoroughly with paper towels.  Whether using your own mix or store-bought five-spice, combine the Chinese five-spice, sugar, and salt in a small bowl.  Rub the spice mixture all over the duck, inside and out.  The salt and five-spice powder will draw some of the moisture from the duck so that the spices penetrate.  Stuff the duck cavity with the aromatics: the ginger, garlic, green onions, and tangerine peel.  Fold the wing tips back under the duck and tie the legs together with kitchen string, tucking the tail inside the legs if it's long enough (see picture).  Score the duck breast a few times, piercing the skin but not the flesh.  This scoring step is crucial!


Rub the spice mix inside and out, then toss the aromatics together and stuff them into the duck.  Tell your taste buds to pack a bag, because they're going on vacation.

Score the skin, WITHOUT scoring the flesh.  See how deep I got the cuts?  This lets the fat literally melt out when you steam it.  A really sharp boning knife helps here.

Place a roasting pan on the stovetop over 2 burners and fill with 2-inches of water, turn the heat to medium. Set a V-rack insert inside the pan and lay the duck on the rack, breast-side up. Cover tightly with aluminum foil. Steam the duck for 45 minutes or more, checking the water level periodically. Steaming the duck first melts away some of the fat and shrinks the skin.


Not really captured too well, I wrapped a giant roasting pan in giant aluminum foil, crimping around the edges.  I recommend doing this with the pan cold, for reasons that became obvious to me shortly after starting.

Preheat the oven to 375 degrees F. 


In a small saucepan combine the vinegar, honey, and soy sauce over low heat. Cook and stir for 5 minutes until thick. The duck will be lacquered with the sweet glaze, which caramelizes during roasting, making the skin crisp and brown. 


Whatever you do, don't walk away from the glaze while you're reducing it.  This was seconds after I noticed a near catastrophe and pulled the heat , but you can see along the inside rim of the pot how high up this sticky mess bubbled before subsiding

Take the foil off the duck, remove the rack with the duck, and pour out the water and all the fat that has rendered out (I saved this liquid and ran it through a fat separator, keeping the delicious duck fat, with intentions of making duck fried rice later this week - I recommend you do the same!)  Put the rack with the duck back on a platter or cutting board.  Baste the duck with the vinegar mixture, until all the skin is completely coated in the glaze.  Let it dry to the point that none is dripping off the duck any more - feel free to let this air-dry in the traditional style, hanging if you're creative, for as much as a day!  Now place some parchment or aluminum foil on the bottom of your roasting pan, return rack with duck to pan, and stick the whole thing in the oven.

Baste that bird!  Give it a coat, let it sit for a few minutes, then give it another coat for good measure.
Roast the duck for 1 hour, tenting breast with foil if it gets too dark.  If you're not worried about burning the glaze to the bottom of the pan, feel free to baste periodically with any remaining glaze to set in a deep mahogany color.  I did this, but it ended up making a burnt-on mess that I had to resolve by pouring in liquid, which in turn compromised my duck's crispiness.  The legs will wiggle easily when it's done.  Carve and serve. 


The finished duck.  I ended up pouring a bunch of liquid in the bottom of the pan to prevent dripped baste from burning to the bird, but do as I say, not as I do.  My directions avoid this problem.

Garnish with green onions, and sesame seeds, and serve with rice and some kind of vegetable


Homemade Chinese Five-Spice Powder


  • 1 tsp. ground Szechwan pepper
  • 1 tsp. ground star anise
  • 1-1/4 tsp. ground fennel seeds
  • 1/2 tsp. ground cloves
  • 1/2 tsp. ground cinnamon
  • 1/2 tsp. salt
  • 1/4 tsp. ground white pepper

First of all, never mind that there are seven ingredients here.  Apparently salt and pepper don't count.  Use whole ingredients if you can for maximum freshness, and grind in a spice mill or coffee grinder.  Mix all ingredients in an airtight jar and store in a cool place.

If you happen to cook WAY too much like me, you may actually have all of these ingredients on-hand.  So next time you don't have five-spice, you can actually make your own

Grind all ingredients finely, one at a time to get the amounts right, and stir.  That's it!

Thursday, December 6, 2012

Seared Salmon with JalapeƱo Ponzu

In an unprecedented bout of productivity, I'm going to post a recipe for something I just cooked tonight, because it was so good and easy that I have to tell the world as soon as possible.  The dish was pretty straightforward - seared salmon in a jalapeno ponzu sauce - but since it was made from scratch and came together in about 15 minutes total, I was totally floored with the quality-to-effort ratio.  I've had ponzu sauce before, but not fresh from home, and I couldn't identify it while out at Japanese restaurants.  Well, now I know.  A sweeter, almost drinkable adaptation of soy sauce, made with citrus juice and one other sweetener.  If you've ever had oyster shooters from a sushi place, this is the sauce they come in.  And with only four ingredients, this is about to become a staple in my fridge, since you could basically lick it off the floor and it would still be good.  Whatever you do, don't skimp out on those four ingredients and buy the pre-made stuff, because you will be disappointed, and I don't want you coming back and blaming me.

This is the second version of the dish, without the jalapeno slices but probably even better than the first

Seared Salmon with JalapeƱo Ponzu
Cooking Light, May 2010

  • 1/4 cup less-sodium soy sauce
  • 2 tablespoons fresh orange juice
  • 2 tablespoons mirin (sweet rice wine)
  • 1 tablespoon fresh lemon juice
  • 1 tablespoon dark sesame oil
  • 4 (6-ounce) salmon fillets
  • 1 large jalapeƱo pepper, cut crosswise into thin slices

Combine first 4 ingredients in a small bowl; mix well.  This is the ponzu sauce, and it's the best part of the whole dish.  Use fresh squeezed juices if you can.


The full ingredient list - no mysteries here, you might even just have these lying around.  Except the fish, I hope.
  
Heat oil in a large nonstick skillet over medium-high heat. Add salmon, skin side down; cook 4 minutes on each side or until fish flakes easily with a fork or until desired degree of doneness.


Sear the salmon skin side down first to cook most of the way through.  The skin can take more abuse than the flesh, and will help bring the pan back down to a moderate temperature for when you flip.
Sear for 4 minutes, then flip and cook another 4 minutes.  Don't worry if you cook the skin a bit too long, it can handle it.
Arrange 1 fillet on each of 4 plates. Top fillets evenly with jalapeƱo slices. Spoon about 2 tablespoons soy sauce mixture over each serving; let stand 10 minutes before serving.


Here's a weird step - after cooking, let the salmon sit with the ponzu sauce drizzled over for a good 5-10 minutes.  This lets the fish cool down a bit, and absorb the flavor of the sauce through the skin and flesh.


Wild Rice and Mushroom Soup


If you're looking to cut back on the amount of meat in your diet without sacrificing flavor, I find that soups are usually a good place to find a ton of flavor packed into a few vegetables (and maybe a fungus or two).  In this case, I found a great soup recipe from Cooking Light Soup in need of very little modification to make it quite hearty.  It's not fully vegetarian, nor would I want it to be, but I suppose you could make it so by swapping the chicken broth for vegetable stock.

Not only is there a fungus in this soup, but there's also a bunch of grass.  Wild rice isn't a grain like regular rice - it's actually a grass, mostly grown in North America and traditionally harvested by paddling a canoe around and knocking the ripe heads off into the boat.  That's why the stuff is so expensive.  The good stuff has a nutty taste and takes forever to cook, so don't expect it to be ready in 20 minutes like white rice.  The bad stuff is cut with regular rice and sold as a 'wild rice blend', often including seasoning salts and other nonsense, and usually containing not much more than about 10% actual wild rice.  The EXCELLENT stuff is still harvested by hand from the Great Lakes region, mostly from Minnesota, and can cost you well over $10/pound, but I hear that it's worth it.  If you want to go all out, get some from Zingerman's up in Michigan.  I found a bag of the decent stuff at Trader Joe's for a decent price.


Grains of pure, unadulterated wild rice, marching off on their final mission


This is how your wild rice used to (and in some cases still does) get to your plate.  Be grateful you stayed in school - this could be you.

Wild Rice and Mushroom Soup
From Cooking Light Soup, modified by me

  • 2 tsp butter
  • 8 ounces button or baby portabella mushrooms, sliced
  • ½ cup chopped carrot (1 medium)
  • 1 large onion, chopped
  • 2 celery stalks, thinly sliced (~3/4 cup)
  • 1 tsp chopped fresh rosemary
  • ¼ tsp black pepper
  • 3 garlic cloves, minced
  • 2 14 oz cans chicken broth
  • 1 cup uncooked wild rice
  • 1/3 cup all-purpose flour, lightly spooned into dry measuring cup
  • 2 ¾ cups 2% milk
  • 2 tbsp dry sherry
  • ¾ tsp salt

I always buy whole mushrooms and slice them myself - much more fresh that way
All you need now are the holy trinity of vegetables, plus some fresh rosemary


Melt butter in a Dutch oven over medium-high heat.  Add mushroom and sautĆ© for 5 minutes, stirring often, to brown the mushroom slices.  Add carrot and next 5 ingredients; sautĆ© 8 minutes or until tender.  If necessary, add another teaspoon of butter to promote cooking.  Stir in broth, scraping pan to deglaze browned bits.  Stir in rice and bring to a boil.  Cover, reduce heat, and simmer 75 minutes or until rice is tender.


You want to deglaze all of that browned deliciousness from the pan with the broth - see the bubbles in the bottom right? That's flavor country.  I'm going to repost another picture when I make this in my new enameled dutch oven, which will make this even better.


Combine flour and cold milk in a small bowl, stirring with a whisk.  Add to soup mixture.  Cook out raw flour for 10 minutes until soup is thickened, stirring frequently.  Stir in salt, kill heat, and either pour in sherry or drizzle individually over each bowl.  Serve immediately.


Drizzle the sherry in at this point, and you're done!

LinkWithin

Related Posts Plugin for WordPress, Blogger...